When your AMP (Autonomous Mowing Platform) is out on the course or field, clean mowing lines and efficient coverage matter. That’s where Auto Sectioning in FireFly’s QuickPlan™ software comes in — it’s a simple switch that can make a big difference in your mower’s efficiency and your turf’s appearance.
What does Auto Sectioning do?
For everyday mowing scenarios, especially in large or oddly shaped areas, QuickPlan™ may create border follows to connect interrupted swaths. While this ensures complete coverage, too many unnecessary border passes can waste time and cause turf damage, disrupting the professional cut quality and top-notch efficiency you expect.
By toggling Auto Sectioning in the Offset, Speed, Options step, QuickPlan automatically reduces these extra border follows. Instead of looping around to connect every break in the mowing path, the software sections the area more efficiently — giving you smoother lines, faster job completion, and healthier, better-looking turf.
In QuickPlan, each swath your mower cuts is shown with a transparent white path line. The more times a swath is repeated — for example, through unnecessary border follows — the more solid that line appears. With Auto Sectioning turned on, you’ll see lighter lines and fewer dark overlaps along the borders, clearly showing how much redundant mowing has been eliminated.
Check out these before and after pictures detailing the difference Auto Sectioning makes:
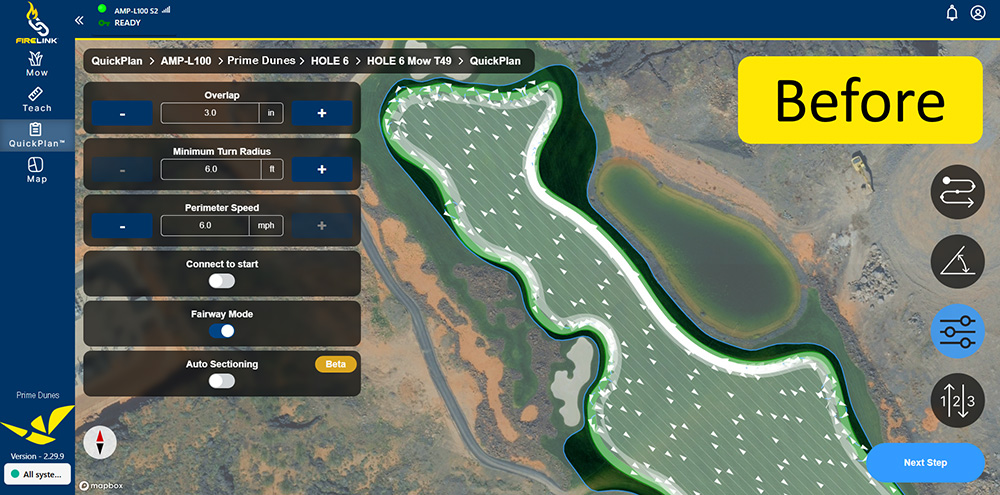
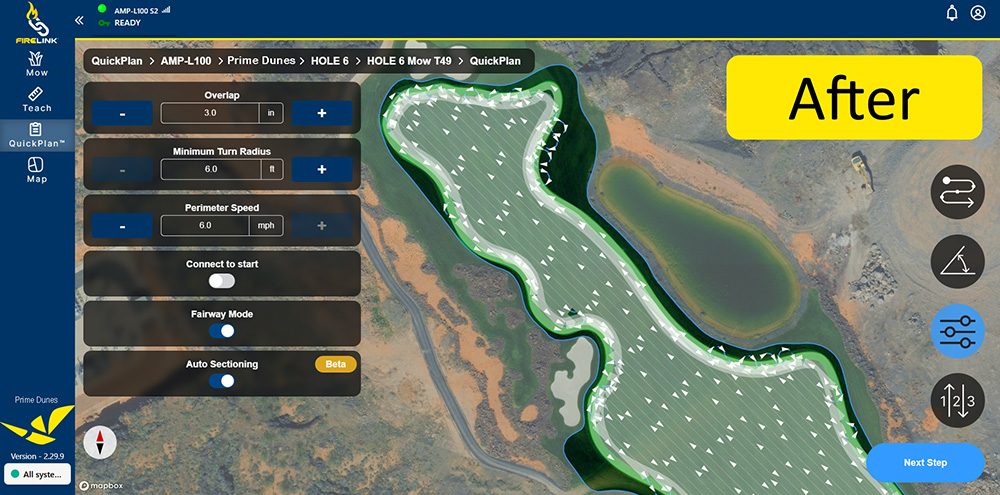
Notice how the border swaths in the After image are more transparent than those in the Before image? That’s the positive impact of Auto Sectioning at work.
Why is this important?
- Saves time and battery life: Fewer redundant passes mean less operating time and lower running costs.
- Cleaner cut patterns: Reduced border follows help maintain a consistent, professional look.
- Healthier turf: Less unnecessary mowing minimizes turf stress and compaction.
In short, Auto Sectioning helps your AMP mow smarter, not harder — keeping your fairways, fields, and grounds looking pristine with less effort on your part.
What are the steps to turn on Auto Sectioning?
Turning on Auto Sectioning is very simple.
When creating a new path
Watch this video to follow along with Austin, or read the step-by-step instructions below. For more details with screenshots, register for a free Support Portal account here.
- Click QuickPlan in the left toolbar of your FireLinkTM instance.
- Select the desired field for the new path.
- Select the sector for the new path.
- Select the area for the new path.
- Click the icon for Offset, speed, options on the right.
- Toggle Auto Sectioning to the on.
- Adjust any other QuickPlan settings as desired.
- Review and save the plan as usual.
Can I add Auto Sectioning to an existing path?
Not directly — but you can easily copy an existing path and turn on Auto Sectioning in the new version. Here’s how.
- Click QuickPlan in the left toolbar of your FireLink instance.
- Select the desired field for the new path.
- Select the sector for the new path.
- Select the area for the new path.
- Click the icon for Offset, speed, options on the right.
- Toggle Auto Sectioning to the on.
- Adjust any other QuickPlan settings as desired.
- Review and save the plan as usual.
Still have questions?
No problem — our world-class Service Team is ready to answer any remaining questions you may have. Give us a call or reach out through our support portal.